|
|
| |
|
| |
|
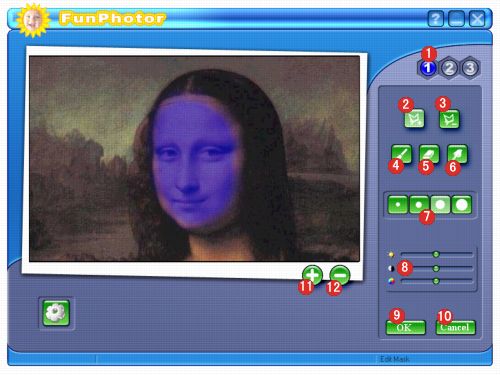
| 1. |
Click
on the corresponding Mask button to create or edit that
mask. |
| |
|
| 2. |
Click on this tool to set your mask by outlining an
area. Click on Add, then click on your template where
you'd like to begin drawing the mask. Drag the mouse to
freehand draw the mask, or click at each point and it
will be connected from the last point. To complete the
area, click on the small square that marks the first point
selected. Your masked area will automatically filled in.
|
| |
|
| 3. |
Click on this tool to select an
area to remove the mask. Click on Subtract, then click
on your template where you'd like to begin removing the
mask. Drag the mouse to freehand draw the mask, or click
at each point and it will be connected from the last point.
To complete the area, click on the small square that marks
the first point selected. Any masking in the selected
area will be removed. |
| |
|
| 4. |
Click on this tool to draw a mask. Click on Paint, change
the Brush Size if desired, then move the cursor over the
displayed template and draw your mask by holding down
the left mouse button. |
| |
|
| 5. |
Click on this tool to draw a mask. Click on Paint, change
the Brush Size if desired, then move the cursor over the
displayed template and draw your mask by holding down
the left mouse button.
|
| |
|
| 6. |
The Blur tool allows you to blur the edges of your mask
so photos blend in better with the template. |
| |
|
| 7. |
These buttons set the size of the Paint, Blur, and Eraser
tools. |
| |
|
| 8. |
Adjusts the brightness/contrast/saturation of the Template
photo. |
| |
|
| 9. |
This button returns you to the Main Screen and adds
the currently selected template to the Main Display Area. |
| |
|
| 10. |
This button returns you to the Main Screen without making
any changes. |
| |
|
| 11. |
This button zooms in to the active photo to make small
adjustments. When zoomed, the Move tools work in smaller
increments, allowing photos to be placed more precisely. |
| |
|
| 12. |
This button zooms out on the active photo. |
| |
|